Poplar Musky Lures

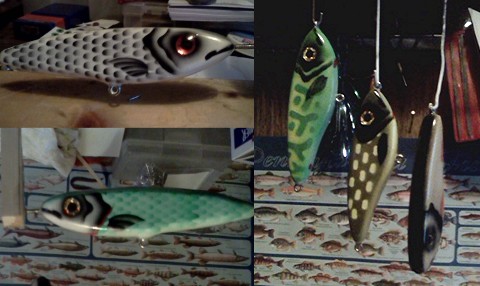
This photo comes from a reader of this blog who goes by the alias Muskeeej. All the lures are made from poplar wood except for the one in the middle with the silvery flank which is a repainted Salmo Slider. As the readers alias would suggest these lures are of course used for musky fishing and similar to myself Muskeej prefers to use more natural baitfish colours on his lures rather than flashy bright colours. I have to say that I particularly like the eyes on these lures and the detail of the fins and gill covers is excellent. Some mighty fine paint jobs here. Muskeej uses water based createx paints for his lure painting and I'm sure the fine detail on these lures is achieved by using an air brush painting system of one sort or another.
More Poplar Musky Lures
Here's a few more lures from Muskeej - some lovely scale patterns. I have to say I particurlarly like the eye details, the shading looks really nice and the bright eye colour will give any predatory fish a real target to home in on.Broom Handle Pike Lure
I received these photos from a reader named Bryan Williams who is based based in West Yorkshire in the UK. This lure is Bryans first attempt at lure making and goes to show that lure making need not be overly complicated - a simple length of broom handle was the material of choice for this lure and it looks like one that will certainly catch a pike or two!
The Following is Bryan's brief account of how he made the lure:
"Anyway here is a run down of my general method on this one.
I used a 6" length of broom handle ,I roughly sanded to shape with an angle grinder with a soft pad on.
I then used a soft used grinding pad and fine sandpaper and sanded by hand to get finished shape.
I then sawed a slit down the middle to accept the wire I was putting in.
I then sawed a slit for the diving vane which I shaped out of a bit of plastic first aid box ( this worked quite well as on warming it was the type of plastic that can be bent into shape by warming over a gas flame then plunging into cold water).
I glued that in.
Obviously this step should have been before I started sanding.
After sanding the marks out that I had made holding in vice I then epoxied the wire in.
The wire was a length of stainless steel welding wire which I get out of the scrap bin at work.
I bent it round some long nose pliers putting an eye each end and one in the middle ,it was a bit hit and miss with the spacing and I think in the end result the eyes are too big and stick ot to much but next time.....
So then after gluing it in I drilled and balanced it with some shot , then masked and primed it with B.I.N which I think is a cracking product.
I sanded and primed it again then sprayed it with some blue car rattle can ,I used an unwound nylon bath scrubber /loofah thing tied on with pegs (A bit of a domestic interlude ensued shortly afterwards) and sprayed with silver car rattle can.
I think in future I will sew a "sock " of nylon mesh on to make it tighter as some of the scales are a bit faint.
After removing the mesh I made a masking template and did the stripes .
I did the eyes with your big and little nail method (my kids like it better without the eyes they say it looks like a Japanese cartoon character) ,I think I did them a bit too big .
I varnished it with Johnson's yacht varnish but I have a fibre glass kit with some resin and hardener which I may bung on it, its got a bit of a red tint to it though but I will try it anyway.
So that's it , a bit rough and ready but that's usually how I do things."
Like many a lure makers first attempt (my own included) a fair bit of trial and error was required to get this lure finished. My thanks to Bryan for sending me these pictures and his account of how he made this lure.


never thought broom handle could be fashioned into a lure. Great job. will have to try making one myself
ReplyDeleteLooks very very good and that much helpful for us
ReplyDelete