A Wooden Mould for Lead Jig Head Making - Surely Not!!!
.jpg)
Most of us who get into the hobby of lure making - or any kind of tackle making for that matter - will find that an awful lot of what we learn is through the method of trial and error. Since I had never even fished a jig before much less try to make one, this little lure building project would be completely trial and probably a lot of error! The brief for this DIY lure making project was simple enough - I wanted some jigs for pike fishing, and fairly big ones at that. I figured that with the cold winter weather on it's way (it was November when I started working on these) some heavy jigs might be just the thing for searching out the deeper areas of my local lakes and rivers where the resident pike would most likely be found at this time of year. The idea was to . . . .
. . . . make a mould of sorts out of wood, use this mould to pour some lead around a large single hook, make the resulting jig head look pretty by painting and adding a skirt and then go catch some pike in deep water - simple!
The Wooden Jig Head Mould
I used a scrap of poplar wood to fashion a mould of sorts as can be seen in the sequence of pictures below. I choose poplar for the mould making as it is very smooth grained and quite easy to work with. You will notice that the mould making procedure is a bit on the 'rough and ready' side. Basically I did not want to spend too much time making a perfect mould (which I could do easily with a router) to build a lure that could of course turn out to be completely useless. I would make a couple of 'rough' prototypes, learn a bit about jig making in the process, test them out when done, and if they caught some fish I could then fine tune my next set of moulds to produce some better quality lures.
 |
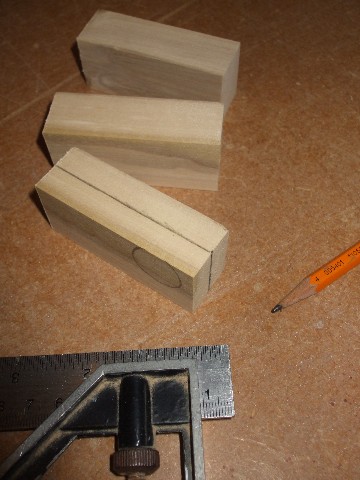
| The Raw Materials for My Three Piece Wooden Jig Head Mould |
I cut three pieces of wood to the same size - two pieces would form the sides of the mould and the third piece would be the main casting body of the mould itself.
.jpg) |
| A 22mm Diameter Hole Drilled Through one of the Pieces Would Create the Jig Head Mould |
Deciding on the size for the main body of the jig head part of these lures was a bit of a guess to be honest. I wanted a fairly heavy lead head of around two ounces or so. I settled on using a 22mm diameter drill bit to drill a hole through one of the pieces of wood which would eventually form the jig head. The position of the hole to be drilled in the piece of wood was marked out as shown in the picture above - near to the end to facilitate the insertion of a hook into the mould and near the top edge to allow for the pouring of the molten lead - the pictures further down this page will illustrate this more clearly.
.jpg) |
| Some Fine Wood Filler was Used to Smooth out the Internal Surfaces of the Jig Head Mould |
After I had drilled a hole in the centre piece of what would become the mould (see above) I rubbed some wood filler into the inside surfaces of the hole to smooth off the rough wood grain a little. Doing this should make it a lot easier to remove the lead jig head from the mould at a later stage. When the wood filler had dried I gave it a rub with some fine sandpaper to smooth it off further still.
.jpg) |
| Cutting the Centre Piece of the Mould into two Equal Halves |
The next step I took was to mark out the centre line of the mould exactly and then use a tennon saw to cut to this line as can be seen in the pictures above and below. Cutting the centre piece of the mould in two halves like this would facilitate the demoulding of the eventual cast jig heads.
.jpg) |
| The Components of a Very Simple Jig Head Mould! |
The components of the mould were then clamped together using a simple quick grip clamp to make sure that everything was lining up and fitting together nicely - see below.
.jpg) |
| All Components of the Jig Head Mould Mould Fitting Together Nicely |
A Hook For The Jig
Not having any proper jig hooks for this project meant that I had to improvise a little. I had in a tackle box somewhere some reasonably sized single hooks that I had used for bait fishing purposes some time ago. After a bit of a rummage through some old fishing gear I found the single hooks in question and set about adapting them for use in this lure making project.
.jpg) |
| Hooks and Wire for Making The Jig Head Lures |
The single hooks I had were a fairly good quality Owner hook in a size 4/0, however the very short shank nature of their design meant that the shank would have to be extended somehow in order for them to be of any use as jig hooks. A bit of fiddling about with some wire and a pliers resulted in the arrangement that can be seen in the picture below.
.jpg) |
| The 'Homemade' Jig Hook |
The wooden jig mould was opened up and the adapted single hook was put into position. The pressure being exerted by the clamp was enough to hold the hook firmly (the hook being sandwiched between the wooden pieces) and keep it in the correct position ready to accept the molten lead.
.jpg) |
| Mould and Adapted Jig Hook Ready for the Pouring of Some Lead |
Melting and Pouring The Lead
With the mould making part of this little project out of the way the rest of the making of these lures was fairly straight forward. The next step was of course to melt some lead and fill the mould.
.jpg) |
| Scrap of Roofing Lead and Tools for Cutting It |
I had saved a scrap of roofing lead I came across on a building site and stored it away for use on my lure making projects. I dug out my rather ugly piece of lead from a corner of the garage where it had been stored and used a tin snips to cut enough from it to make two jig heads. A good quality tin snips is the perfect tool for cutting down pieces of sheet lead like this. The lead was first cut into a number of long narrow strips about a quarter inch wide and these strips were then crosscut into tiny rectangular pieces which were deposited into my simple homemade melting pot. Cutting the lead into small pieces like this helps it to melt down more quickly.
.jpg) |
| A Pot Full of Lead Ready for Melting Down |
.jpg) |
| The Lead Being Heated on One of the Electric Hobs in the Kitchen |
.jpg) |
| The Lead in it's Molten State Just Before Pouring |
.jpg) |
| The Homemade Jig Mould Filled with Lead |
The lead was very simply melted and poured in the kitchen using the electric hob and a small homemade melting pot (see pictures above). I find that this type of lead which is generally used by roofers for flashings around chimneys and other roofing joints is very soft and easy to work with. Of course I make sure that there's nobody else in the kitchen when I'm messing about with lead as the fumes given off during the melting process are not too healthy and some degree of care needs to be taken!
.jpg) |
| De-Moulding the Jig Heads |
Making Good And Finishing the Lead Jig Heads
Rather annoyingly I completely misjudged the amount of lead needed to fill the moulds in one go and so ended up pouring the two jig heads in two stages - you can clearly see the horizontal joints which resulted on the baits in the picture below. Also the point at which the 'jig hook' protruded from the lead head looked like it could be a rather weak point and certainly needed some attention. The solution to these two problems was very simple - epoxy putty.
.jpg) |
| The Jig Heads Looking Rather Ugly at this Stage! |
.jpg) |
| Epoxy Putty Being Prepared for use on the Jig Heads |
.jpg) |
| Epoxy Putty is Easily Mixed by Hand |
Epoxy putty is a very simple to use material which comprises of a resin and hardener - both in soft putty form - which when kneaded together react with each other to produce a material that is almost as hard as steel. Once you start to mix the stuff you have about ten minutes to mould and shape it before it goes off and sets up solid. I mixed a small quantity of putty and used it to fill in and smooth over the surfaces of the jig heads. I also moulded some putty around the area where the wire extended from the lead head creating a small hump of sorts on the shank of the hook which would serve as a holder for the skirt later on.
.jpg) |
| The Jig Heads After Being 'Dressed' with Epoxy Putty |
Although probably not really necessary I gave the jig heads one coat of epoxy clear coat before painting. This was easy to do as I was set up for and clear coating some other lures anyway - had I not been I might have skipped this step altogether.
.jpg) |
| The Jig Heads Were Given One Coat of Epoxy Before Painting |
.jpg) |
| Clear Coated Jig Heads Ready for Painting |
Painting The Homemade Jig Heads
With these baits being quite small, compared to say jerkbaits for example, the painting process would not need to be very detailed - no need for stripes, gills or fins. I decided however that some sort of detail in the form of scales and eyes would be used to pretty them up a bit. It would seem that one of the more standard ways to paint lead jig heads is by using powder paints. These paints are in the form of a powder which when coated onto the baits and subjected to heat will 'melt' onto the baits leaving a lovely hard glaze finish. Since I did not have any kind of powder paint and was not particularly interested in getting some just for the purpose of this project I would be using my standard spray can enamel paints for these jig heads. The first step however was to dip the jig heads in some plain white primer.
.jpg) |
| Dipping the Baits in White Primer Prior to Painting |
.jpg) |
| The Jig Heads were Hung up to Dry Between Coats of Primer |
.jpg) |
| The Jig Heads were Now Ready for Spray Painting |
I find that dipping lures in paint is a great way to even out some of their minor imperfections as the paint kind of fills in any little scratches or dents. With this in mind and the fact that I was in no particular hurry with finishing these lures I dipped the jig heads four times leaving them to dry overnight between coats which resulted in a nice even base coat of white paint on them (see above).
.jpg) |
| Apologies for the Crappy Photo But You Get the Idea - One was Sprayed Black the Other Silver |
Using some bait holding clamps that I had made to hold and rotate the jig heads with one hand while spraying using an aerosol spray paint with the other I painted one of the jig heads black and the other one silver. These colours would serve as a base coat for the scale pattern that I planned to spray on next - black being a base for silver scales and silver being a base for black scales.
.jpg) |
| Using Mesh to Create a Scale Pattern |
.jpg) |
| Silver Scaled and Black Scaled Jig Heads |
.jpg) |
| This Close Up Shot Shows the Scale Pattern a Little More Clearly |
I used some plastic mesh that I had saved from some supermarket vegetable packaging as a stencil to spray through and create a scale pattern of sorts on the jig heads as shown above. Due to the uneveness of the sides of the jig heads the scale patterns did not come out as neatly as I would have liked, though I doubt that any pike that might be willing to bite one of these will stop to examine the paint job before doing so!
.jpg) |
| Eyes Were Painted on Using the Large and Small Nail Method |
.jpg) |
| A Single Coat of Epoxy was Applied to Help Protect the Paint |
The jig heads were finally finished off by dotting on some eyes (using a larger nail dipped in white first and then a smaller nail dipped in black) and giving the whole paint job a covering with some epoxy clear coating.
Homemade Jig Skirts
Having completed the jig heads it was now time to sort out some jig skirts and then these new lures would be ready for water. Of course you can buy some good quality skirt making materials (usually silicone) from most fishing tackle suppliers and a number of online lure making supply websites. In keeping with the theme of this blog however 'Homemade Lures' that is, the jig skirts for this project would have to also be homemade. I had read an article in a fishing magazine some time ago about a guy who was experimenting with making his own flies for pike fishing using all kinds of different materials.
One of his pike flies in particular, the body of which was made almost entirely out of tinsel, had caught him a pike of over 20lbs! Now if tinsel could work for a pike fly then why not a pike jig? With it being Christmas week as I finished off these lures tinsel of all kinds was not in short supply. I picked out two colours that I liked the look of at a local discount store and set about making some pike fishing jig skirts out of Christmas tinsel.
.jpg) |
| Bits and Pieces for Making Jig Skirts |
Working with the tinsel was a little fiddly but I eventually figured out an easy way to make up the skirts. The tinsel I had bought came in strands that were about 20 inches long (see above) which were attached to a piece of card at one end to keep them all together. I pinched a quantity of tinsel strands at the centre of their length and cut them from the card they were attached to.
I now had a quantity of tinsel pinched between my thumb and index finger with 10 inches or so of tinsel hanging down from either side of my finger and thumb. The two sides were folded together to create one bundle of folded over tinsel strands which was 10 inches long (still folded at one end). This bundle was tied together temporarily and loosely at it's centre using a small cable tie (now with 5 inches of tinsel either side of the cable tie) to keep it all together - see the picture below.
The cable tie was not flexible enough to allow the tinsel skirt to thread over the jig hook and onto the 'neck' of the jig head but served as an excellent way of holding everything together while a piece of heavy elastic band was used to tie the bundle together as can be seen in the picture. With the elastic band in place and tied fairly tightly the cable tie was then carefully slid off the bundle of tinsel.
.jpg) |
| The Tinsel Jig Skirt Being Prepared For Attaching to the Jig Head |
Before sliding the tinsel skirt onto the jig hook the loops at the end of the bundle of tinsel were cut through with a scissors thus creating a bundle of 10 inch strands of tinsel rather than a bundle of folded over 20 inch strands. The tinsel skirt was then carefully slid all the way over the jig hook and up onto the neck of the jig head - see below.
.jpg) |
| Attaching the Skirt to the Jig Head |
With the jig skirt now in place I replaced the elastic band with a cable tie (attaching the cable tie first then removing the elastic). This time I fixed on the cable tie as tightly as possible around the neck of the jig head thus trapping the skirt in place.
.jpg) |
| The Skirt Was Secured in Place Using a Small Cable Tie |
When the cable tie was properly secured I trimmed off it's tag end as short as possible and adjusted the strands of tinsel folding them back on the neck of the lure until I achieved the look I was after - see below.
.jpg) |
| The Skirts were Adjusted to Achieve the Look I Wanted |
.jpg) |
| The Finished Pike Jigs Ready For Water |
Not Perfect Lures But an Idea Worth Sharing
The finished jigs (above) don't look all that bad really. Sure they are a bit 'rough round the edges' and far from perfect. They may indeed never catch a fish but I think that the idea of using wood to make cheap throw away jig moulds has some merit. If you are the kind of fisherman who uses jigs a lot, as I know many bass fishermen do, and go through a lot of jigs in the run of a fishing season then making your own wooden jig head moulds probably wont be very practical. If like me however you only need a few jigs as a now and again method or to try when other methods fail to produce the goods sort of thing then I think making some fishing jigs in this way could be well worth your time.
If you stop by to read this
lure building blog from time to time then I hope you enjoyed this new post and maybe took away few ideas for your own lure making. If this is your first time to find this blog then welcome and be sure to check out some of the other posts and articles while you are here. Unfortunately time does not allow me to do nearly as much lure making, fishing or posting on here as I would like to so new lure making posts will be slow in coming. I do however have a few other lure making projects on the go at the moment the details of which will eventually be posted here.
I have to say that I'm looking forward to getting my new homemade pike jigs to the water and hopefully catching a decent pike or two! If you are interested in finding out how I get on with them then be sure to check back here from time to time.
Joe.


.jpg)
.jpg)
.jpg)
.jpg)
.jpg)
.jpg)
.jpg)
.jpg)
.jpg)
.jpg)
.jpg)
.jpg)
.jpg)
.jpg)
.jpg)
.jpg)
.jpg)
.jpg)
.jpg)
.jpg)
.jpg)
.jpg)
.jpg)
.jpg)
.jpg)
.jpg)
.jpg)
.jpg)
.jpg)
.jpg)
.jpg)
.jpg)
.jpg)
.jpg)
.jpg)
17 comments :
Excellent job you did, I´ll try this at home!
thanks for this great idea!
i have been trying to create a mold out of plaster of paris, it doesn't work.
thanks Joe,
This is a great idea!
@Martín Flores
Hey Martin, thanks for your comment.
The jigs did not turn out too bad really. I have not actually caught anything with them yet but then I've only spent ten minutes or so casting them around to see how they swim.
The lead heads are way too heavy to be honest but they would still be useful for bottom bouncing over deep water. The tinsel skirts however give a lovely action in the water - much better than I had been expecting!
I'm confident that I will eventually get around to catching something with them but at the moment I'm enjoying my jerkbait fishing too much to give these jigs any serious fishing time!
Joe.
@Anonymous
Part of my reason for making these jigs in the first place was to see if wooden moulds could actually work for molten lead. If you were only making a few jig heads then it works okay, but if you plan to make a lot of jigs then you might have to bite the bullet and buy a proper metal mould of some sort!
Joe.
@Anonymous
Thanks for your comment, glad you liked the idea.
Joe.
@Joe
Thanks Joe, I would try them in a smaller size, around 1 oz, maybe less... I will send you back my results.
brill brill brill.....def gonna get stuck into sum of your ideas.beats the crap outa lots of the shop bought gear......luv piking kendo.
@Anonymous
Hey Anonymous,
there is a lot of satisfaction to be gained from building your own lures and even more satisfaction from catching fish on them! Glad you liked some of the ideas in my blog.
Joe.
just a lure maker sayin somthin, you could make a round head profile by curving a paddle tail bit into a shape that will produce a round or differently shaped head, you may need a steel funnel, THAT DOES NOT HAVE PAINT OR OTHER COATINGS.(safety first)
Hi Joe,
Good idea for medium to deep fishing. A word of caution to all, do not melt lead inside, very dangerous for your neurons ; unless you plan on retirering soon.
@Marc
Hey Marc,
thanks for your comment. Safety tips are always welcome. I guess I sometimes assume that people would just know this stuff - but that's not always the case.
If anyone is going to copy my method above for melting their lead on a kitchen hob they need to also follow my safety measures which I neglected to mention in the post (my bad).
1) Ensure that the hob you're working at has a good overhead extractor fan and turn it on to full power.
2) Open all windows and doors where possible to ensure good ventilation of the area you are working in and leave them open for 30mins or so after you have finished working with your lead.
3) Most importantly make sure there is nobody else around (especially kids or animals) and under no circumstances stand with your head over the melting pot looking in to watch the lead melt.
SAFETY FIRST!
Joe.
you could try lead free solder (plumbers solder), but the melting temperatures are higher... but better for the environment and your self.
@Anonymous That's a great tip. I'll try it out on a future project and see how it works. Another idea I'm trying out at the moment is to make the jig heads from epoxy putty - easy to work with and no messing about with molten metal.
Joe.
Joe, Curing epoxy fumes are not good for you either. They can be explosive in large enough quantity. You'll want to be as adequately ventilated while working with epoxy as you are for working with the lead.
@Boneyfingers Hey there Boneyfingers. You are quite right, the fumes from curing epoxy is not too good for our health and to be avoided as much as possible. With the small amount of epoxy we luremakers use for coating a few lures though, I think the risk of blowing up our sheds or garages is pretty small:-)
Joe.
felicidades muy buen trabajo gracias por compartir.
Post a Comment