Making Crankbaits Using Free Lure Templates
I Decided To Buy A Lure Making E-Book
As I mentioned in an earlier post, one of the first things I did when I originally got interested in making my own lures was to do some research on the internet to find out as much about lure making as I could. There is of course plenty of lure making information around the web but you will find that it is scattered all over the place. I decided that I would buy at least one book or ebook on the subject of lure making which might shorten my
lure making learning curve. After having a good browse around on the internet to see . . . . .
. . . . . what lure making books, ebooks or videos were available I decided on the ebook
Make Your Own Fishing Lures - Wooden Lures by Australian lure maker Greg Vinall.
 |
| The First Lure Making Ebook That I Bought |
I plan to write a review of this ebook in a future post to let any of you that may be interested in this book know exactly what I thought of it. I will give you an idea as to what is and what is not contained within it's pages and also give you my opinion of the overall quality of the ebook in general. Prior to buying the lure making ebook I had signed up to an email newsletter over at Greg's website. His very first email contained two free crankbait templates which anyone can get simply by visiting his site and signing up for the newsletter. (Edit - It seems that Greg has changed his website around a bit and the newsletter is now unfortunately not available, however you can still check out his website by following
this link).
Using Proven Crankbait Templates
 |
| The Templates That I Used For Making The Crankbaits |
Despite the fact that my first lure making project had been all about
jerkbaits and that I really needed to make a few more of them for my pike fishing I couldn't resist having a go at making some crankbaits as crankbait making seems to be the most popular lure making topic online. I printed out the two free
lure templates mentioned above and started to make the two crankbaits using the techniques described in the lure making ebook that I had bought.
 |
| Items For Making Lure Templates - Template Printouts, Scissors, Cardboard and Glue |
The first step in making these two crankbaits was to print out the templates, glue them to some cardboard and then cut out their profiles using a scissors. When working on my
first lure making project (jerkbaits) I used 4mm thick hardboard to make the lure templates. I can see now that using such a 'heavy' material for the templates was not necessary and that using plain old cereal box cardboard is much simpler, quicker and easier to do. Another lure making lesson learned!
 |
| Lure Templates Glued To Some Cardboard And Ready To Be Cut Out |
Once I had the lure templates cut out and ready for use I had to get some wood to use for making the lure blanks. For the
jerkbaits I had made previously I had used poplar for no reason other than I had lots of scraps of the stuff lying around my workshop. I have since found one or two other lure makers who have made reference to using poplar as a lure making material for their lure making projects and so decided to use it for making these crankbaits also. Another reason that I decided to stick with poplar as the material of choice for making these crankbaits is that the jerkbaits that I had made in my earlier lure making project displayed fairly nice actions and even
caught me some fish on my first day out with them!
Marking Out The Crankbait Blanks
I will of course experiment with using other woods for making my lures at a later date but for now I will stick to using poplar. Before using the lure templates to mark out the lure blanks I cut the poplar down to the correct length, width and height for each of the two lures. Doing this would reduce the amount of material that I would need to remove during the shaping process, ie less cutting, less filing and less sanding. With the lure blanks cut to the required dimensions I next marked out the centre lines along both the sides and the top and bottom of the two pieces of wood. These centre lines would help me to locate the lure templates in the correct positions (centrally) on the wood blanks for marking out the lure profiles.
 |
| Marked Out Lure Blanks And Lure Templates |
Cutting The Throughwire Slots
After I had the lure blanks marked out and was happy that all the profiles I had drawn onto the pieces of wood were in fact properly centred I went ahead and cut out the slots along the length of each of the lure blanks that would hold the through wires. I had decided on through wire construction for these crankbaits rather than screw in eyelets as most of the waters that I fish contain pike, some of which may be strong enough to snap a small poplar wood lure in half!
 |
| Clamps, Handsaw And Padsaw Were Used To Cut The Throughwire Slots |
I clamped each of the lure blanks in turn to my workbench and used a fine toothed handsaw to accurately cut along the centreline I had marked on the 'belly' of each of them. The saw cut produced by the handsaw I used was not quite wide enough to allow the throughwires to slot into the bodies of the lures so I used a padsaw to widen the saw cuts in each of the lure blanks.
 |
| Lure Blanks With Throughwire Slots Cut Out |
Cutting Out The Diving Lip Slots
With the throughwire slots now cut out the next step before starting to shape the lures was to cut the slots for the diving lips (or bibs). Cutting out these slots using a handsaw was quite tricky but I did the job in a similar way to how I had cut out the throughwire slots by clamping the blanks to my bench, first cutting with a fine toothed saw and then widening the cut with a padsaw.
 |
| This Step Was A Little Tricky To Get Right - Slots For Diving Lips |
Cutting Out The Top And Side Profiles Of The Crankbaits
Now that the diving lip and throughwire slots were cut into the lure blanks I could crack on with shaping the actual bodies of the lures. I had never done this type of lure shaping before so was quite looking forward to learning how to do it. I used the techniques described in the lure making ebook that I had bought to shape the wooden bodies of the lures. The first step here was to cut out the side profile of each lure using a coping saw.
 |
| Lure Blanks Cut To Side Profile Shape |
When the side profiles had been cut out the lure templates were needed again to mark out the top profiles on the lure blanks. Before I did this I gave the top of each blank a light sanding so that it would be easier to mark lines onto the wood. Lining up the top profile lure templates with the centre lines on the nose and tail of each blank as accurately as possible I marked out the next lines I would need to cut to. Using cardboard for your lure templates is a good idea as can be seen in the picture below - it's flexibility allows you to bend the template to the curved shape of the lure blank.
 |
| Using The Templates Again To Mark Out The Top Profiles |
The next job I had to do was to cut the lure blanks to the top profile lines that I had just marked out. I did this again using a coping saw and some clamps to hold the lure blanks in place while I was cutting them. When the cuts along the top profile lines were complete the blanks were already beginning to look like lures.
 |
| With The Top Profile Lines Cut to The Blanks Were Looking a Little More Like Lures! |
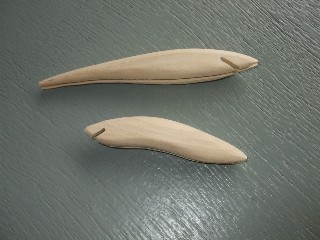
Shaping The Wooden Lure Bodies
So far so good. Now it was time to shape the lure blanks by rounding over all the square edges and sanding down to the desired finished shape. Again I referred back to the ebook I had bought and used a combination of utility knife, coarse and fine files and some sandpaper to reduce the lure blanks down to the required shapes.
 |
| Utility Knife, File And Sandpaper Were Used To Shape The Lure Blanks |
 |
| A Rub With Some Really Fine Sandpaper And The Lures Are Ready For The Next Step |
Making The Crankbait Diving Lips
The next job in the crankbait making process that I needed to tackle was to make the diving lips (bibs) for the lures. The theme of this blog so far has been 'homemade lures' and as such I will try to make my lures using stuff that I already have rather than buying something new. With this in mind I had a good look around the house and garage to see if there was any clear plastic material lying around that may be suitable for use in making the diving lips for my crankbaits. I eventually found an old broken CD box, the cover of which looked like it might do the job. The clear plastic that these CD boxes are made from can be quite brittle but I decided I'd try using it for these two crankbaits and see how I'd get on.
 |
| Crankbait Lips Marked Out On An Old CD Box Lid |
I used the templates to mark out the diving lips onto the clear plastic lid and then used a coping saw to carefully cut out their profiles. I also cut a little slot out of the centre of each diving lip to allow it to fit around the throughwire which would be fitted internally within the lure going from nose to tail. The edges of the diving lips were 'cleaned up' using a file and care was taken during the cutting and filing process to get them as close to fully symmetrical as possible.
 |
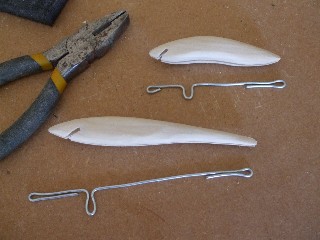
| The Cut Out Diving Lips And Templates |
Making The Throughwires
With the diving lips ready to go there was one more thing to do before I was ready to start putting the lure together. I had to make the throughwires that would be fitted internally within the lures. I used some regular garden tying wire for making the throughwires which was a little bit neater looking than the copper wire that I had used for making
my first few jerkbaits. I made the throughwires by marking the outline of the lures onto a scrap of wood (using the lure templates) and then hammering some nails into the positions on each lure where I would need the wire to bend. I then bent the wire around each set of nails to create the throughwires.
 |
| Lure Blanks With Throughwires Ready To Be Fitted |
Fitting The Throughwires
At this stage I was now ready to start putting the crankbaits together so to speak. I would first need to glue the throughwires into the lure bodies and then fit the diving lips. I had used two part epoxy in my earlier lure making project to glue the throughwires into the jerkbait bodies and I have to say that the epoxy did the job very well. For this project however I wanted to experiment with a different type of glue. I had two reasons for wanting to try some different glue on these lures.
Firstly two part epoxy is exactly that - 'two parts' and as such requires mixing which can be a little messy to say the least. And secondly the method of mixing two parts together can also be quite wasteful of the epoxy itself as it can be difficult to gauge the correct amount of glue to mix for whatever it is that you are doing with it. Any glue which would not require mixing and which would allow you to use only the exact amount that you needed would be, in my opinion, a better option than two part epoxy. A product called Gorilla Glue is one such glue that I have used for other wood working applications over the years and it has yet to let me down. If it would perform as well as the two part epoxy for glueing in the throughwires only time would tell!
Having decided to use Gorilla Glue for glueing in the throughwires on these crankbaits I put a generous amount of glue into the throughwire slots in each lure using a piece of wire to make sure the glue was well spread out within each slot. I then pushed the throughwires into the lure bodies and waited for the glue to react. When the glue was fully set I used a utility knife and some sandpaper to clean off the excess hardened glue and smooth over the belly of each lure.
 |
| I Used Gorilla Glue to Set In the Throughwires |
Fitting The Diving Lips
At this stage it would seem that most lure makers go ahead with sealing the lure and painting it before finally fitting the diving lip to the lure at the end. Now this is all well and good if you know that the lure will balance properly. If it is your first time to make a particular lure the only way that you can know if the lure will be balanced or not is to test it for balance. The only way to do this is to add all the parts - split rings, hooks, diving lip, etc - seal the lure and put it into some water.
By testing the lure for balance you will find out whether it needs internal weighting or not, how much weighting it actually needs and what size hooks and split rings to use. When making the same lure again in the future you may then leave fitting the diving lip till last as you will already know how much weight (if any) to add to the lure, where to add the weight and what size hooks and split rings to use on the lure.
As I did not know the hook size/internal weighting combination for either of these two crankbaits I would have to fit the diving lips to them now in order to be able to seal them and balance them properly. I used two part five minute epoxy to glue the diving lips into the crankbaits. Using a small thin stick (a piece of wire would also work well) I filled the diving lip slots in each crankbait with enough epoxy so that when I would push in the diving lips they would squeeze out the excess glue thereby fully filling the inside of the slot all around the diving lip with glue.
 |
| I Used Two Part Epoxy To Glue In The Diving Lips |
Great care needs to be taken at this stage in order to ensure that the diving lips are correctly positioned and centred on the crankbaits. This step was a little tricky because you need to examine the crankbaits from a number of different perspectives and make sure that the diving lip looks good in each - look at them from the sides, from the top, underneath and from the front. It is at this stage that you will find out if the slots that you cut earlier for the diving lips are in fact square with the body of the lure. One of mine was near perfect the other was a little off. This is obviously something that you should get better at over time!
 |
| Sighting In The Diving Lips To Make Sure They Are Centred Properly |
 |
| The Tricky Job of Attaching the Diving Lips Completed |
Sanding And Sealing The Lure Blanks Prior To Balancing
With the throughwires and diving lips fitted to the crankbaits it was now time to give the lures one last fine filling and sanding to smooth over any uneven areas paying particular attention to the belly area of the lures.
 |
| The Lures Sanded Smooth and Ready for Sealing |
To seal the lures I first put some masking tape on the diving lips to prevent them from getting covered in paint and then dipped them into some white shellac primer that I had in the workshop. I thinned the primer down considerably using methylated spirits to get a very thin coating on the lures. The great thing about this particular type of primer is that it dries very quickly and I was able to get two coats of primer onto the lures in quick succession - sanding with fine sandpaper between coats. With my previous lure making project I had used an oil based primer (which worked very well) to seal the four jerkbaits. I did however have to wait overnight for each coat to dry which is a slow process. Using the shellac primer on this occasion allowed me to go ahead and balance the lures within thirty minutes or so of priming them.
 |
| Crankbaits Drying Between Coats of Primer |
Balancing The Crankbaits
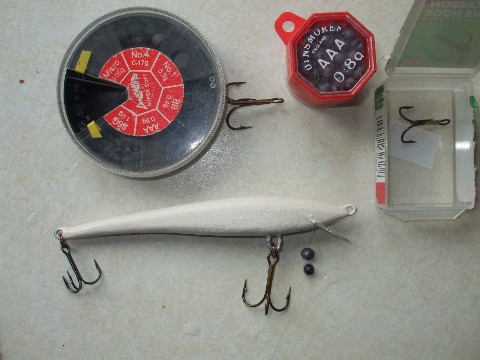
Now to balancing the lures. As I had never made any crankbaits before I was not very sure how the lures should balance, obviously these would be floating divers but I had a few questions that needed answering before I could balance these crankbaits properly. Should they sit horizontal in the water, nose up or nose down? What level in the waters surface should they sit - Back just touching the surface, half in/half out? What size hooks to use? The quickest way I figured to answer these questions would be to pull a few similarly sized and shaped crankbaits out of my lure box and see what size hooks they had on them and how they sat in the water.
 |
| Comparing My Homemade Crankbaits to Shop Bought Ones to Gauge Hook Size and Balance |
To balance my homemade crankbaits I very simply filled the kitchen sink with water and dropped in two shop bought crankbaits I owned that were similar in shape and length to the ones I was making. I then took note of how my shop bought crankbaits sat in the water - how they were balanced as such. I could now balance my homemade baits so that they would sit in the water in the same way as my shop bought baits. The picture below shows how my homemade crankbaits compared to the shop bought ones. The smaller of the two crankbaits I was making would not need any balancing at all as it sat perfectly in the water when hooks were attached. The larger crankbait however was a fair bit off balance and would need some internal weighting to get it sitting correctly in the water.
 |
| Balancing My Homemade Crankbaits - The One on Top Was Perfectly Balanced The Bottom One Needed Weighting |
 |
| The Crankbaits Drying Between Gloss Clear Coats |
Another Lure Making Project Complete
At this stage rather than go into detail about how I applied the epoxy hardcoat I'm going to leave that for a blog post all of it's own. With the hardcoat applied all I need do is add some hooks and take these lures for a 'test drive' so to speak. To see how I get on fishing with these crankbaits keep an eye on the 'homemade lure fishing diary' section of this blog where I'll be adding some more posts as soon as I get the time.
 |
| The Finished Crankbaits Ready for Hardware and Testing |
 |
| Hooks and Split Rings to Finish off The Lures |
 |
| Crankbaits Ready for Fishing |
So there you have it - another homemade lures project completed. At this point I have not made a start on my next project yet. There's no doubt that I need more jerkbaits and crankbaits and I will eventually get around to building out my collection but for the sake of keeping this blog interesting I think that I might move on to something different for my next lure making project. I have a few ideas for how to make jigs without having to buy expensive moulds so I reckon that's what I will probably do next . . . . .
I hope you found this blog post interesting and as always, if you have a question you'd like to ask or an idea you'd like to share fell free to post your comments below.


22 comments :
Man this is my favorite homemade lure website! !
Liam
@Anonymous
Hey Liam, thanks for your comment.
This blog has been a bit slow going lately as I just have not had the time to sit at my computer for any length of time to do some writing.
I have however been busy building a lure drying wheel, working on some new crankbaits and doing more testing of my homemade jerkbaits. I,ve even caught a few half decent fish - all of which I'll be writing about as soon as I get the time!
Do check back here from time to time as there's plenty more lure making stuff on the way!
Joe.
Impressive and very informative. Thanks
@Đinh Công Bằng
Thanks for your kind comment, glad you enjoyed reading this lure makng blog post.
Joe.
Verry good thanks!!!
@Anonymous
Glad you enjoyed this post, thanks for reading.
Joe
Hi Joe,
Nice job on the lures!
Just wanted to let you know that my eBook is still available, plus I'll make the templates available to your readers ;-)
I have some other bits and pieces that might be of interest to you also - flick me a post or email!
Best regards
Greg
@Greg Vinall
Hi Greg,
I'm glad to hear that your ebook is available again - pretty good lure making guide there!
I'll shoot you an email when I get the time, quite busy with work and other stuff at the moment - unfortunately no time for fishing or lure making :-(
Thanks for stopping by my blog, I'll be in touch . .
Joe.
how do you attach the hooks?
@Anonymous
Hey Anonymous,
Apologies for taking so long to reply to your comment, the run up to Christmas has in recent years been a crazily busy period for me ( and no, I'm not Santa Claus) so unfortunately this blog has been all but abandoned for the last two months!
Good question regarding how to attach the hooks to a crankbait though. I guess that this is obviously something that some people who are very new to lure making might not know. I can see why you asked the question - the last picture of the finished crankbaits on this blog post was one without the hooks attached.
The standard way of attaching hooks to crankbaits and indeed to most other types of fishing lure is to use what are known as split rings - same as what's on your key ring only a lot smaller. I've updated the post above with pictures of the hooks I used with split rings attached and the fitted out lures with hooks on them to help answer your question more clearly.
Hope this helps and thanks for stopping by my blog,
Joe
Fantastic couple of lures, I have picked up a few valuable tips. I've just started making lures, probably for the same reason most people do, ££££! I have been picking up scraps of wood and whittling them into whatever shape emerges,as well as other bits just lying around, they are a bit rough & ready but do the job, the thrill of getting bites is indescribable! I am hoping to try my hand at soft lures next! Great blog, tight lines...
@Anonymous
Thank's for your comment and I'm glad you found some useful tips here on my blog.
I think you'll find as you get more into the hobby of lure making that you don't end up saving much money (if any) by making your own lures. Those of us who are addicted to making our own know that the cost of making your own lures matters little. The thrill of catching good fish on something you made yourself is something that money just can't buy!
Best wishes with your lure making and thanks for stopping by.
Joe.
This has got to be one of the best reads on the web,I am a novice fisherman and and after catching a 2ft pike last week on a rubber shad in a foot of water just as I was about to lift the lure out I was hooked on pike myself .
I decided to research lure making as I am on a tight budget and found this blog.
I appreciate the trial and error style and the experiences you had testing your lures.
I have just stared my first one ,made out of a yard brush handle ,using B-I-N primer ,green spray can paint and silver gray spray galv. paint with yacht varnish top coat!
I am fully expecting the various paints to react with each other but until I can gather together more compatible gear this will have to do as I cant wait to make one.
I am using stainless steel welding wire for the hook holders.
Thanks for a great blog. Bry.
@Bry Williams
Hey Bry thanks for your comment. I love to hear success stories from newcomers to the sport - well done on your 24" pike. I took two local kids fishing with me there about two weeks ago one of which had been doing some carpentry/cabinet making work with me as part of the local high schools work experience program, the other, his younger brother. We had baits in the water at just after 5.00am or so. The fishing was unusually slow that morning but going home at about 10.00am the two youngsters had caught a pike each - one of about 6lbs and the other a very nice pike of 11lbs. Two young fishermen well and truly hooked on pike fishing!
As regards your paint job I would not expect that you will have any problems with reacting paints. I myself have used BIN primers on my lures in the past to good effect and had no problems with using enamel spray can paints over the top of them. The yacht varnish should also be reasonably compatible with the spray can paints. The only problem you will have is with the pikes teeth. Your yacht varnish top coat won't even come close to protecting your lure from the sharp teeth of an angry pike. You will have to learn how to use epoxy clear coats as soon as you can. Either Envirotex Lite or Devcon epoxies will do nicely with Envirotex Lite being my own personal preference.
I wish you the best of luck with your lure making and pike fishing. If you are happy with how your lures turn out why not send me a few pictures - I'll post them on my readers page.
Joe.
I have thought of this for a few years now so this time I'm going to take a break from my photos and fishing to try
@Anonymous
You won't regret your decision to give lure making a go. Watch out though, making your own lures can become as addictive as the fishing itself!
Joe.
Really cool blog. Lots of helpful tips. I started making my own lures too and think its an addiction. Here is my first lure. http://nomadskayakfishingodysseys.blogspot.com/2013/07/the-original-kayak-fishing-lure.html?m=1
I'm starting to make more . Its a fun hobby
@David Sanders
Hey David, thanks for stopping by my blog, I really like your Kayak Lure - a very original idea. I wonder if you have caught anything with it yet? You're quite right this lure making hobby is certainly an addictive one. I'll be sure to keep an eye on your kayak fishing blog to see what your next lure turns out like (if you post it that is).
Joe.
This blog is great. I have decided I will start making lures, but I'm not sure what I'll need can you give me a list.
-thanks,
Erik
@Anonymous Hey Erik, thanks for your interest in my blog, sorry for the delay in replying to your comment, been quite busy lately!
A quick question back at you first though - exactly what type of lures do you want to build first? Different kinds of lures require different tools and materials so if I know what kind of lure you're building I can give you a better list!
Joe.
hi joe what gage garden tie did you use to make the throughwire
@Nathan Dennis
Hey Nathan, thanks for stopping by my blog. The garden wire I used for the crankbaits described in the post above was 1.2mm thick galvanised wire. In hindsight this wire was just a bit on the heavy side for lures of this size. If I were making these same lures again I would step down a gauge or two in wire thickness. I reckon something like 0.75mm thick wire would be about right.
Joe.
Post a Comment