My Homemade 'Static' Lure Drying Rack
Up until now at any time that I have been working on painting, sealing or putting epoxy coatings on
my homemade lures I have been hanging them up to dry between coats on various makeshift '
hanging stations' usually consisting of a piece of string stretched between two points somewhere in my workshop. This set up has been, well, less than ideal. A more organised and effective way of hanging up my lures between coatings, whether sealing coats, finishing paint or epoxy clear coats would make my lure making life a little easier. The time had come to make a simple lure drying rack. . . . .
 |
| Lures Hanging From a Line of String In My Workshop |
The heading of this post might have you wondering
what exactly a 'static' lure drying rack is? There are basically two kinds of rack you can make or use to hang your lures to dry on - one is a stationary (or static) rack, the other is a mobile rack (which is usually rotating). The idea with a stationary kind of lure drying rack is that you very simply hang up your baits and leave them to drip dry as such. The idea with a mobile or rotating lure rack is that the motion of the rack continually moves your lures end over end (or side over side) which encourages a more even distribution of paint/sealer/epoxy coatings over the bodies of your lures.
It goes without saying that a rotating lure drying rack would do a much better job than a simple stationary kind of rack but the lack of time and indeed the parts to build one means that for now I am using a simple 'static' lure drying rack for my
lure making projects. I do of course plan to build a proper rotating rack at some stage but for the moment I am achieving satisfactory results with my simple stationary lure rack. The step by step instructions laid out in the rest of this post below will take you through the procedure I used to make my very simple lure drying rack.
Step One - Design Your Lure Rack and Gather Materials
 |
| The Basic Materials I Used For Making The Lure Drying Rack |
The design of this lure drying rack was not going to be anything in any way complicated, certainly no need to call an architect or engineer! A simple piece of wood with a few screw eyelets along its length to hang the lures from and supported at either end somehow would do the job. The key points regarding the design would be the overall measurements of the rack – the lure drying rack needed to be the right size for hanging the typical size of baits that I would be making and need to hang up for drying.
I figured that baits of about 6 inches (150mm) to 8 inches (200mm) would be the largest that I would be making for
my pike fishing for the moment and if I would be making any larger lures in the future I could simply build a bigger lure rack. Therefore the lure drying rack that I built was designed to comfortably hang up six homemade lures side by side that could be a maximum of about 8inches long. To do this job I figured the hanging rack would need to be about 20 inches (500mm) long and about 10 inches (250mm) from the base to the hanging points.
Step Two - Cut the Base to Size
Step Three - Cut the Pieces for the Frame
 |
| The Sides of the Frame Were Cut 10 Inches Long and the Top was Cut at 19 Inches |
For the hanging frame I used some ⅞ inch (22mm) square poplar that I had in the workshop - a leftover scrap from a cabinet making project. Again any kind of similar sized piece of wood could be used for this. I cut the top hanging piece at 19 inches (475mm) long which would leave the frame set back from each end of the base by ½ inch (12mm).
Step Four - Assemble the Frame.
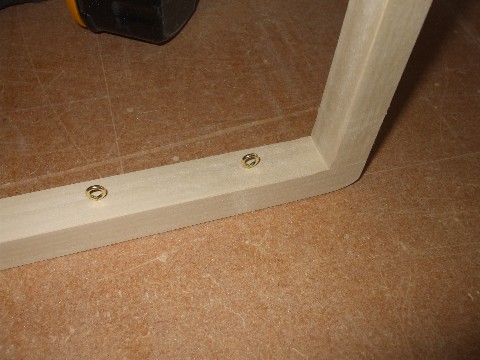
 |
| Drill a Pilot Hole and Counter Sink Before Screwing the Frame Together |
The frame was very simply screwed together as shown using two 8 gauge 2 inch (4 × 50 in metric) screws - one either end of the frame . Make sure to drill pilot holes for the screws and counter sink the heads. Neglecting to do this will almost certainly result in the wood splitting when you try to screw the frame together. When the frame had been assembled I got some medium grit sandpaper and gave the whole thing a light going over, mostly to take the 'sharpness' off the square edges of the wooden frame.
 |
After the Frame was Assembled I used Sandpaper to Slightly 'Round' All Square Edges
|
Step Five - Set Out and Attach the Eyelets
 |
| I Drilled Some Pilot Holes for the Little Screw Eyelets |
The dimensions of my little frame were such that the internal measurement between the two vertical supports was 17 ¾ inches (430mm). This was divided equally by six (six lures to hang) to give the spacing between the eyelets. The first eyelet is set at half of this measurement (one twelfth of the overall distance between the insides of the frame) from the inside edge of your frame. The picture above should explain this a little better. Don’t worry if you get the setting out of the eyelets wrong they are very easy to move around again later.
The eyelets that I used were small screw in brass ones, the kind that are generally used for picture hanging or that sort of thing. These eyelets are much bigger than the ones used for lure making - the larger size should make the hanging and unhanging of lures on the rack much easier. You could easily make your own eyelets out of your lure making wire and glue them into the frame, however you won’t have the convenience of being able to move them around easily should you need to.
 |
The Screw Eyes Were Simply Threaded in by Hand
|
Step Six - Screw the Frame to the Base
 |
| Marking Out the Edge and Centre Line for the Frame on the Base |
This step is fairly straight forward. Just mark out the centreline and edge positions of the frame onto the base. Drill pilot holes in the base and then line up the frame with the pencil marks on the base and screw the frame and base together.
 |
| The Frame was Lined up with The Marks on the Base and Secured with a Screw |
Step Seven - Make Some 'S' Hangers
A few wire hangers will be required to hang your lures on the rack. These are very easily made by bending some wire into sort of ‘S’ shapes as shown in the picture below.
 |
| Simple 'S' Shaped Wire Hangers for Hanging up Lures to Dry |
Step Eight - Test the Lure Rack
Before you go working on painting or clear coating any
homemade lures make sure that you hang a few of them on your new lure drying rack and make a ‘dry run’ of sorts. This way you will find out if your lures will hang nicely without being too close together and that you can easily hang and unhang them while you are working on them. If your lure rack should require any modifying it is far better to find this out before you go painting any lures!
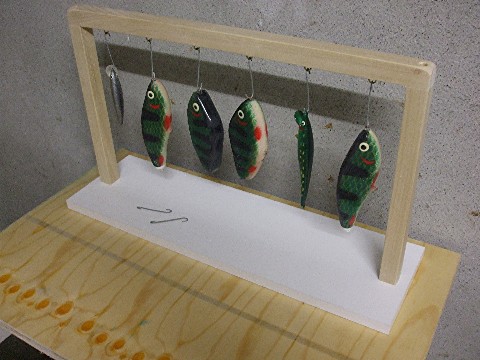
 |
| The Finished Lure Drying Rack |
Well there you have a very simple little project that made one of my
lure making tasks a whole lot easier. I hope you found this post interesting. If you have any questions you'd like to ask about this lure drying rack or even an idea to share feel free to post your comment in comments section below.
Joe.


4 comments :
Yea I know Joe , This pain in the butt got something to say about everything. I have made both type of racks. This may seem hard to believe but I've had much better end results with the "static"rack. Let me explain. First, I use envirotex lite.It levels itself perfectly. Pop the escaping gas bubbles and that's it.No need to rotate. Second and most important, the less moving parts the less chance of screw-ups.Several times using my rotating rack I've missed tiny spots. (with envt. lite there is no second chances or sanding or filling in ) Had 1 lure drip onto another and just a complete series of mishaps. With the static system, coat'm,hang'm wait 5 minutes and heat gun'm throw a box over'm (dust n dirt) and that's it.Joe, being a carpenter,I'm sure you realize to never try to fix something that isn't broke. IMO stick with the fine hanger you already made or work on ways to improve it.Unless you are going into production leave the mobile hanger headaches to someone else. muskeeej
@MUSKEEEJ
I'm glad you commented here. I was thinking the same thing myself regarding lure drying racks.
When I first got some Envirotex Lite to clear coat my first few lures I went about reading everything I could find on the subject. It would seem that most guys use a lure turning wheel of some sort to keep their lures rotating while their clear coats level out and set up. Well if that is what everyone else was doing then that is what I would need to do - right.
I set about building a fairly simple turning wheel that would work in the chuck of one of my cordless drills and it worked quite well initially on a test run with some lures without epoxy on them (see picture here). When I went about actually using the turning wheel for clear coating my lures disaster very nearly struck!
What happened was that some of the epoxy naturally worked it's way into the 'jaws' that were holding the lures by their noses. This epoxy had the unexpected effect of lubricating the 'jaws' causing the lures to slip out and fall on the floor. Luckily I had a clean scrap of plywood placed on the floor beneath the turning rack so no harm came to the lures. I simply touched in any of the epoxy that had been rubbed off and hung up the lure by their noses to dry kind of expecting the worst!
I'm sure you know what happened though - the clear coat levelled out nicely, all the excess dripped off onto the floor and the end result was a near perfect clear coat. As you can see I learned by accident that hanging lures statically gives a very acceptable finish to my clear coats.
My clear coating procedure differs to yours slightly in that I return to my lures every 10 minutes or so in the first hour to turn them nose over tail (or vice-versa). Each time I turn them I inspect them for dimples or dust boogers in the coating and 'touch in' where necessary. I have on a few occasions been able to find dimples in the epoxy on my third or fourth time of turning that I had somehow missed earlier.
Although I probably will go ahead and build a lure turning wheel of some sort eventually it is not something that is high on my list of lure making priorities at the moment. As you quite rightly pointed out the less moving parts the better!
Joe.
Hey Joe, I hope all is well with ya.As usual, my ability with the written word is lacking.I re-read what I wrote and what I meant was after 5 minutes I start popping bubbles( unless of coarse I take my wife shopping) for about 45 min. to an hour.Now I just learned a new trick from Tony Spicker (owner of Big Game Tackle).After mixing the e-tex , hit it with a torch before putting the lures. It almost totally eliminates all the gas bubbles and I know this makes no sense but it also seems to cut down on the dust attracting ability of the e-tex. It also goes on smoother and seems to set up flatter.The lengthy of time you hit the e-tex is pretty important. The milky color should just start to turn clearer. JUST START , NOT COMPLETELY CLEAR. I used this method on my last run of lures and I'm real happy with the results. I think I'm on the wrong page of your blog with this. Sorry. Have a good one muskeeej
@MUSKEEEJ
That makes more sense alright - thought you knew some secret technique that allowed you to walk away from your lures after 5 mins! With E'tex Lite you really do need to pay attention to what's happening to your lures for at least the first hour after coating them - can be really frustrating stuff to work with at times.
Joe.
Post a Comment